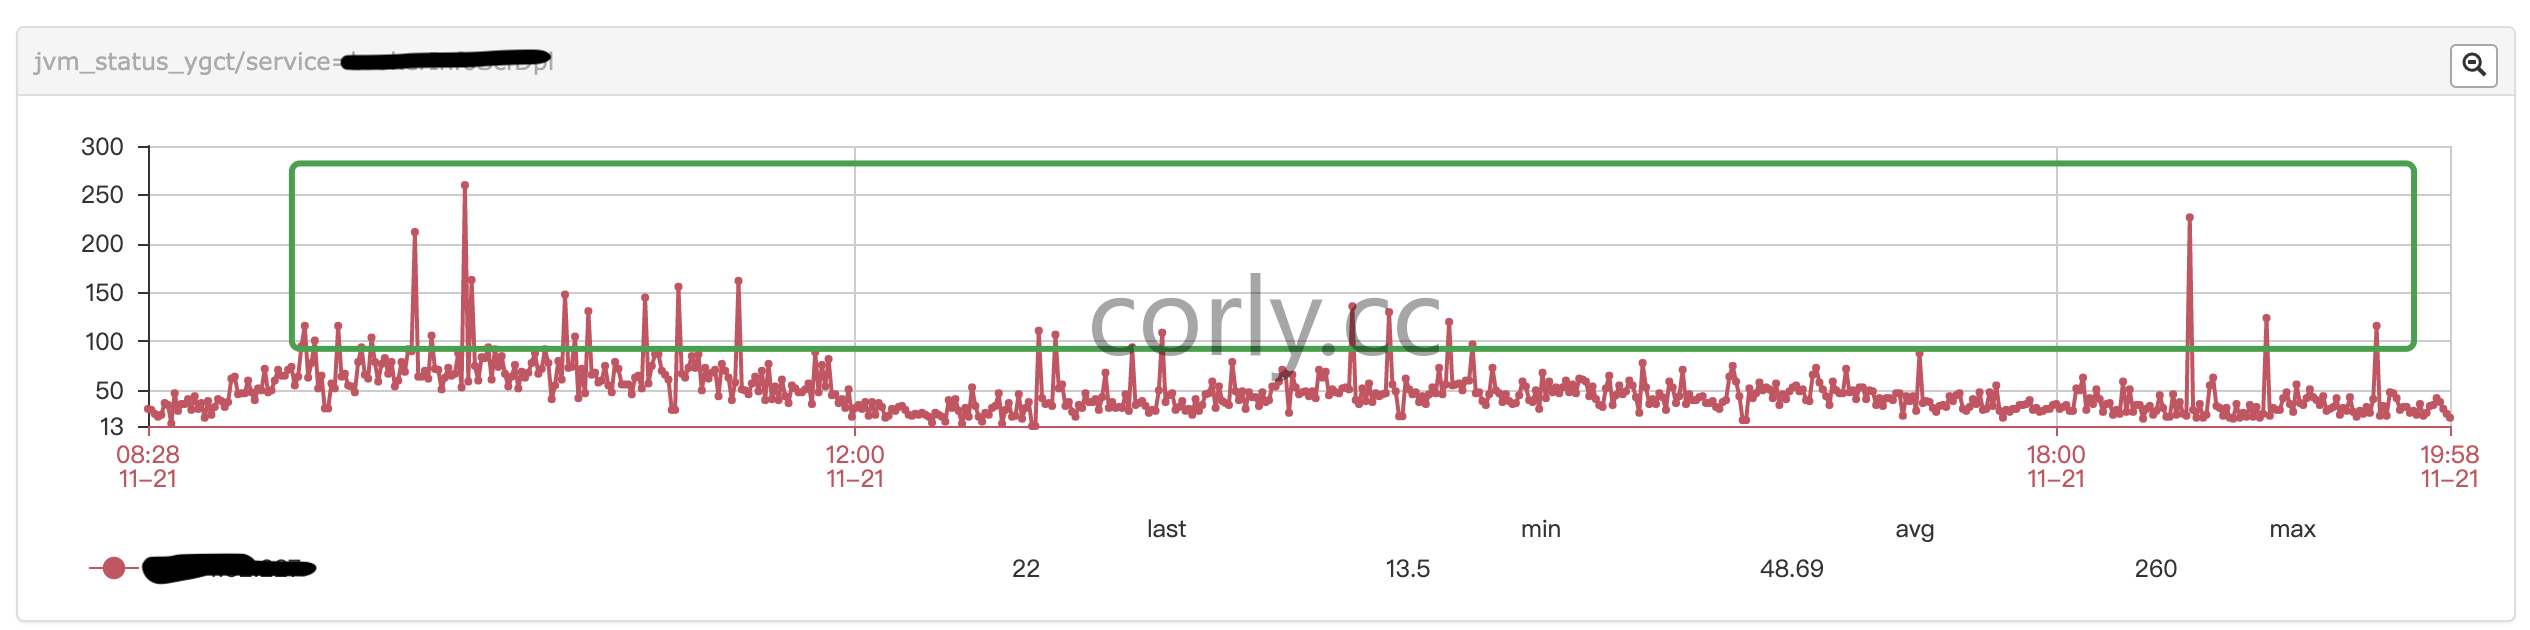
数据流重导向可以将 standard output (简称 stdout) 与 standard error output (简称 stderr) 分别传送到其他的文件或装置去,而分别传送所用的特殊字符则如下所示:

  1. 标准输入  (stdin) :代码为 0 ,使用 < 或 << ;
  2. 标准输出  (stdout):代码为 1 ,使用 > 或 >> ;
  3. 标准错误输出(stderr):代码为 2 ,使用 2> 或 2>> ;
阅读全文 »

CRUD

insert

1
INSERT INTO db1_name (field1,field2) SELECT field1,field2 FROM db2_name

alter

修改编码

1
2
ALTER TABLE `article` 
CHANGE COLUMN `breif` `breif` TEXT CHARACTER SET 'utf8mb4' NULL DEFAULT NULL ;

conmand

mysqldump

  1. 导出整个数据库

    1
    mysqldump -u [uname] -p[pass] db_name > db_backup.sql
  2. 导出所有的数据库

    1
    mysqldump -u [uname] -p[pass] --all-databases > all_db_backup.sql
  3. 指定数据库中的表

    1
    mysqldump -u [uname] -p[pass] db_name table1 table2 > table_backup.sql
  4. gzip 压缩

    1
    mysqldump -u [uname] -p[pass] db_name | gzip > db_backup.sql.gz
  5. 其他

    1
    2
    mysqldump -P 3306 -h [ip_address] -u [uname] -p[pass] db_name > db_backup.sql  
    mysqldump --single-transaction -u corly-p -v --host=mysql.corly.cc shu_student > shu_student.sql

import

1
mysql -u username -p -h localhost DATA-BASE-NAME < data.sql

import large csv file

修改MySQL的配置文件,my.cnf
[mysqld]
max_allowed_packet=1000M

执行如下命令导入csv文件

1
2
3
4
5
mysql -uroot -proot --local-infile shu_student -e "
load data local infile '~/mengshuang/canteen/output2/part.csv'
into table canteen_result
fields terminated by ','
lines terminated by '\n'"

###自动备份数据库

1
2
3
4
5
6
7
8
9
10
11
12
13
14
15
16
17
18
19
20
21
22
# /bin/bash
DB_NAME=""
DB_USER=""
DB_PASS=""
BIN_DIR="/usr/bin"
BACK_DIR="/root/backdata"
DATE="mysql-`date +'%Y%m%d-%H:%M:%S'`"
LogFile="$BACK_DIR"/dbback.log
BackNewFile=$DATE.sql
$BIN_DIR/mysqldump --opt --force -u$DB_USER -p$DB_PASS $DB_NAME > $BACK_DIR/$DATE.sql
echo -----------------------"$(date +"%y-%m-%d %H:%M:%S")"----------------------- >> $LogFile
echo createFile:"$BackNewFile" >> $LogFile

# 删除7天之前的备份
find "$BACK_DIR" -ctime +7 -type f -name "*.sql" -print > "$BACK_DIR"/deleted.log
echo -e "delete files:" >> $LogFile
cat $BACK_DIR/deleted.log | while read LINE
do
rm -rf $LINE
echo $LINE>> $LogFile
done
echo "---------------------------------------------------------------" >> $LogFile

用户管理

  • 查看所有用户
1
SELECT DISTINCT CONCAT('User: ''',user,'''@''',host,''';') AS query FROM mysql.user;

创建用户

1
CREATE USER 'username'@'host' IDENTIFIED BY 'password';
  • username:你将创建的用户名
  • host:指定该用户在哪个主机上可以登陆,如果是本地用户可用localhost,如果想让该用户可以从任意远程主机登陆,可以使用通配符**%**
  • password:该用户的登陆密码,密码可以为空,如果为空则该用户可以不需要密码登陆服务器

示例

1
2
3
CREATE USER 'web'@'localhost' IDENTIFIED BY '123456';
CREATE USER 'web'@'192.168.1.101' IDENDIFIED BY '123456';
CREATE USER 'web'@'%' IDENTIFIED BY '123456';

授权

1
GRANT privileges ON databasename.tablename TO 'username'@'host';
  • privileges:用户的操作权限,如select,insert,update,delete,create,drop,index,alter,grant,references,reload,shutdown,process,file等,如果要授予所的权限则使用ALL
  • databasename:数据库名
  • tablename:表名,如果要授予该用户对所有数据库和表的相应操作权限则可用表示,如.*

示例

1
2
GRANT SELECT, INSERT ON test.user TO 'web'@'%';
GRANT ALL ON test.* TO 'web'@'%';

用以上命令授权的用户不能给其它用户授权,如果想让该用户可以授权,用以下命令:

1
GRANT privileges ON databasename.tablename TO 'username'@'host' WITH GRANT OPTION;

更改密码

1
SET PASSWORD FOR 'username'@'host' = PASSWORD('newpassword');

如果是当前登陆用户用

1
SET PASSWORD = PASSWORD("newpassword");

删除用户

1
DROP USER 'username'@'host';

其他

  1. 查看数据库占用空间大小
1
2
3
4
SELECT table_schema                                        "DB Name", 
Round(Sum(data_length + index_length) / 1024 / 1024, 1) "DB Size in MB"
FROM information_schema.tables
GROUP BY table_schema;

安装Solr

https://lucene.apache.org 下载Solr包。

我这里下载的版本是5.5的,官方给的启动方式:

/solr-5.3.1:$ bin/solr start -e cloud -noprompt

这里 -e cloud 是官方给的示例,如果不想用官方的示例,自己创建可以用如下方式

solr-5.5.0 bin/solr start -noprompt

//然后自己创建一个collection
solr-5.5.0 bin/solr create -c recruiting

新建的collection的存放位置:solr-5.5.0/server/solr/recruiting/

添加中文分词

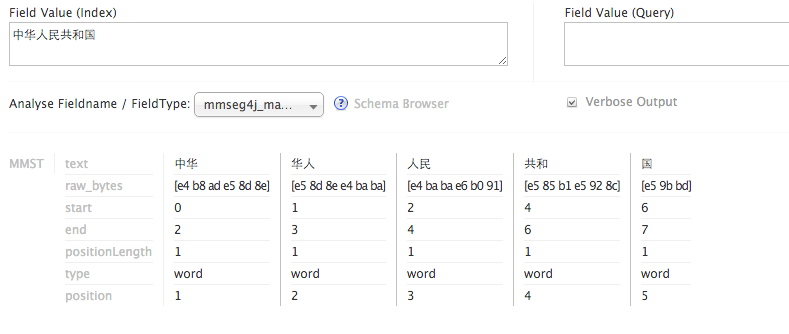
这里使用 mmseg4j 分词,下载地址:https://github.com/chenlb/mmseg4j-solr

将下载的jar包,移动到WEB-INF/lib下

solr-5.5.0 mv ~/Downloads/mmseg4j-* ./server/solr-webapp/webapp/WEB-INF/lib

修改新建的collection下的conf下的schema.xml文件,这时你发现并没有这个配置文件,但是你会发现有个managed-schema文件,打开一看里面有如下内容:This is the Solr schema file. This file should be named “schema.xml” and should be in the conf directory under the solr home(i.e. ./solr/conf/schema.xml by default)

所以将managed-schema文件重命名为schema.xml,修改配置文件,添加中文分词。

solr-5.5.0 vim server/solr/recruiting/conf/schema.xml

添加如下配置:

1
2
3
4
5
6
7
8
9
10
11
12
13
14
15
16
17
<fieldType name="mmseg4j_complex" class="solr.TextField" positionIncrementGap="100">
<analyzer>
<tokenizer class="com.chenlb.mmseg4j.solr.MMSegTokenizerFactory"
mode="complex" dicPath="dic"/>
</analyzer>
</fieldType>
<fieldType name="mmseg4j_maxword" class="solr.TextField" positionIncrementGap="100">
<analyzer>
<tokenizer class="com.chenlb.mmseg4j.solr.MMSegTokenizerFactory" mode="max-word" />
</analyzer>
</fieldType>
<fieldtype name="mmseg4j_simple" class="solr.TextField" positionIncrementGap="100">
<analyzer>
<tokenizer class="com.chenlb.mmseg4j.solr.MMSegTokenizerFactory"
mode="simple" dicPath="dic" />
</analyzer>
</fieldtype>

上面添加了三个filedType,他们组要的区别为:

  • mmseg4j_simple 使用Simple分词方法
  • mmseg4j_complex Complex 加了四个规则过虑
  • mmseg4j_maxword 默认。在complex基础上实现了最多分词(max-word)。“很好听” -> “很好|好听”; “中华人民共和国” -> “中华|华人|共和|国”; “中国人民银行” -> “中国|人民|银行”。

成功运行后如下:

Solr中文分词

从MySQL数据库中导入数据

在schema.xml中添加field,默认有一个id字段,然后再添加你数据库中的字段。

1
2
3
4
5
6
7
<field name="id" type="string" indexed="true" stored="true" required="true" multiValued="false" />
<field name="title" type="mmseg4j_complex"
indexed="true" stored="true" required="true" multiValued="true" />
<field name="major" type="mmseg4j_complex" indexed="true"
stored="true" required="true" multiValued="true" />
<field name="content" type="mmseg4j_complex" indexed="true"
stored="true" required="true" multiValued="true" />
  • name: 数据源字段名,搜索时使用到。
  • type: 搜索的类型名,例如我们配置的mmseg4j,这个对应filedType中的name。不需要分词的字符串类型,写上string即可。
  • indexed:是否被索引,只有设置为true的字段才能进行搜索排序分片(earchable, sortable, facetable)。
  • stored:是否存储内容,如果不需要存储字段值,尽量设置为false以提高效率。
  • multiValued:是否为多值类型,SOLR允许配置多个数据源字段存储到一个搜索字段中。多个值必须为true,否则有可能抛出异常。

题外话

copyField节点
如果我们的搜索需要搜索多个字段该怎么办呢?这时候,我们就可以使用copyField。

1
2
3
4
5
6
7
<copyField source="name" dest="all" />
<copyField source="address" dest="all" />
<copyField source="description" dest="all" />
<copyField source="city" dest="all" />
<copyField source="district_name" dest="all" />
<copyField source="merchantCategory_name" dest="all" />
<copyField source="bank_name" dest="all" />

我们将所有的中文分词字段全部拷贝至all中,当我们进行全文检索是,只用搜索all字段就OK了。
注意,这里的目标字段必须支持多值,最好不要存储,因为他只是做搜索。indexed为true,stored为false。

修改solrconfig.xml文件,位置solr-5.5.0/server/solr/recruiting/conf/solrconfig.xml。 添加如下配置

1
2
3
4
5
6
<requestHandler name="/dataimport" 
class="org.apache.solr.handler.dataimport.DataImportHandler">
<lst name="defaults">
<str name="config">data-config.xml</str>
</lst>
</requestHandler>

在solr-5.5.0/server/solr/recruiting/conf/ 下创建data-config.xml 文件,配置如下:

1
2
3
4
5
6
7
8
9
10
11
12
13
14
15
<dataConfig>
<dataSource type="JdbcDataSource"
driver="com.mysql.jdbc.Driver"
url="jdbc:mysql://localhost/recruiting"
user="root" password="root"/>
<document>
<entity name="requireds"
query="SELECT id,title,major,content FROM recruiting.requireds">
<field column="id" name="id" />
<field column="title" name="title" />
<field column="major" name="major" />
<field column="content" name="content" />
</entity>
</document>
</dataConfig>

solr-dataimporthandlermysql-connector两个jar包拷贝到solr-5.5.0/server/solr-webapp/webapp/WEB-INF/lib当中。

solr-5.5.0 cp dist/solr-dataimporthandler-5.5.0.jar server/solr-webapp/webapp/WEB-INF/lib
solr-5.5.0 mv ~/Downloads/mysql-connector-java-5.1.38.jar ./server/solr-webapp/webapp/WEB-INF/lib

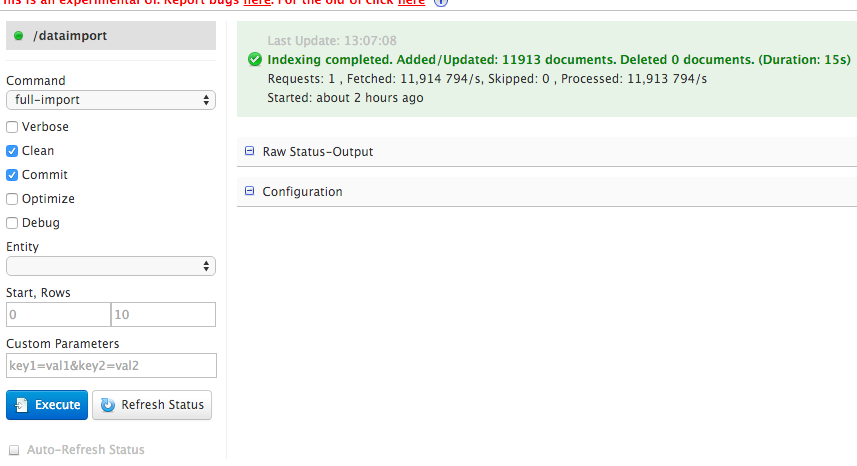
重启服务bin/solr restart,选择当前core为recruiting,然后点击dataimport,如果配置正确,就会出现如下图,点击Execute就可以了

dataimport.png

&

通过**&**可以直接将命令丢到背景中运行,比如我们要将 /etc/ 整个备份成为 /tmp/etc.tar.gz 且不想要等待,那么可以这样做:

tar -zpcf /tmp/etc.tar.gz /etc &

在背景当中运行的命令,如果有 stdout 及 stderr 时,他的数据依旧是输出到萤幕上面的。所以,最佳的状况就是利用数据流重导向, 将输出数据传送至某个文件中。

tar -zpcvf /tmp/etc.tar.gz /etc > /tmp/log.txt 2>&1 &

jobs

观察目前的背景工作状态。

jobs [-lrs]

选项与参数:
-l :除了列出 job number 与命令串之外,同时列出 PID 的号码;
-r :仅列出正在背景 run 的工作;
-s :仅列出正在背景当中暂停 (stop) 的工作。

fg

将背景工作拿到前景来处理

fg %jobnumber

bg

让工作在背景下的状态变成运行中

➜ ~ jobs; bg %1; jobs
[1] + suspended sh fq.sh
[1] + 10348 continued sh fq.sh
[1] + running sh fq.sh

kill

管理背景当中的工作

kill -9 %2
-9 :立刻强制删除一个工作;

nohup

nohup 可以让你在离线或注销系统后,还能够让工作继续进行。

nohup [命令与参数] <==在终端机前景中工作
nohup [命令与参数] & <==在终端机背景中工作

如果你再次登陆的话,可以使用 pstree 去查阅你的程序。

disown

我们已经知道,如果事先在命令前加上 nohup 就可以在你关闭终端后继续运行程序。但是如果我们未加任何处理就已经提交了命令,该如何补救呢。

disown 它可以将指定任务从”后台任务”列表(jobs命令的返回结果)之中移除。一个”后台任务”只要不在这个列表之中,session 就肯定不会向它发出SIGHUP信号。

1
2
3
4
5
6
7
8
9
10
11
12
13
14
15
# 移出最近一个正在执行的后台任务
$ disown

# 移出所有正在执行的后台任务
$ disown -r

# 移出所有后台任务
$ disown -a

# 不移出后台任务,但是让它们不会收到SIGHUP信号
$ disown -h

# 根据jobId,移出指定的后台任务
$ disown %2
$ disown -h %2

问题描述

基因序列由字母G、A、T和C构成的字符串,现要判定一个基因中是否有结构的基因元素。

输入

输入有多组测试数据。每组有2行,第1行是由字母G、A、T和C构成的字符串str表示一个基因序列,第2行是一个由字母G、A、T和C构成的字符串str1表示的基因元素。

输出

对每组数据,统计str1在str中出现的次数。

输入样例

AGTCGATCGAGAGTTC
AG
TTTACCGAGA
TAC

输出样例

3
1
1
2
3
4
5
6
7
8
9
10
11
12
13
14
15
16
17
18
19
20
21
22
23
24
25
26
27
28
29
30
31
32
33
34
35
36
37
38
39
40
41
42
43
44
45
46
47
48
49
50
51
52
53
public class Main1 {

public static void main(String[] args) {
// TODO Auto-generated method stub
Scanner in = new Scanner(System.in);
while(in.hasNext()){
String str = in.nextLine();
String str1 = in.nextLine();
Main1.match(str, str1);
}
}

/**
* 统计str1在str中出现的次数
* @param str
* @param str1
*/
public static void match(String str, String str1){
//p 保存匹配的第一个字符在str 中的位置
//q 指向后续元素匹配的位置
int p = 0,q=0;
//统计一共有多少个匹配
int count=0;
char[] strArr = str.toCharArray();
char[] str1Arr = str1.toCharArray();
for(int i=0; i<strArr.length; i++){
if (strArr[i] == str1Arr[q]) {
//将i的值保存起来
p = i;
i++;
q = 1;
for ( ; i < strArr.length; i++) {
if (q < str1Arr.length && strArr[i]==str1Arr[q]) {
if (q == str1Arr.length-1) {
count++;
i = p + q;
q = 0;
break;
}else{
q++;
continue;
}
}else{
i = p;
q = 0;
break;
}
}
}
}
System.out.println(count);
}
}

问题描述

给定线段PQ和三角形ABC,求三角形面积并确定线段PQ是否与三角形相交。

输入

有多组测试数据。输入的第一行上有正整数n,表示有n组测试数据。每组测试数据有2行:第一行上有6个整数x1 y1 x2 y2 x3 y3,整数之间用一个空格隔开,他们分别表示三角形ABC的三个顶点坐标A(x1,y1)、B(x2,y2)、C(x3,y3);第二行是4个整数u v w t,整数之间用一个空格隔开,他们表示线段PQ端点P和Q的坐标P(u,v),Q(w,t)。

输出

对输入中的每组测试数据,先输出一行,内容是“Case i:”,其中i是数组的编号(从1开始)。在下一行上输出三角形的面积(四舍五入保留1位小数),空一格后输出三角形与线段的相交情况:对给定的三角形ABC和线段PQ,如果线段PQ与三角形的边相交,那么输出“Yes”,否则输出“No”。约定:当线段PQ在三角形内部时,PQ与三角形的边不相交。

输入举例

2
0 0 4 4 0 4
1 2 1 3
0 0 3 4 0 4
0 -3 -1 -4

输出样例

Case 1:
8.0 No
Case 2:
6.0 No
1
2
3
4
5
6
7
8
9
10
11
12
13
14
15
16
17
18
19
20
21
22
23
24
25
26
27
28
29
30
31
32
33
34
35
36
37
38
39
40
41
42
43
44
45
46
47
48
49
50
51
52
53
54
55
56
57
58
59
60
61
62
63
64
65
66
67
68
69
70
71
72
73
74
75
76
public class Main {

public static int direction(int[] pi, int[] pj, int[] pk){
return (pi[0]-pk[0])*(pi[1]-pj[1]) - (pi[0]-pj[0])*(pi[1]-pk[1]);
}
/**
* 判断点pk是否在线段 pi,pj 上
* @return boolean
*/
public static boolean onSegment(int[] pi, int[] pj, int[] pk) {
if ( Math.min(pi[0], pj[0]) <= pk[0] && pk[0] <= Math.max(pi[0], pj[0]) &&
Math.min(pi[1], pj[1]) <= pk[1] && pk[1] <= Math.max(pi[1], pj[1]) ) {
return true;
}else {
return false;
}
}
// 判断线段 p1,p2 和线段 p3,p4 是否相交
public static boolean segmentInsert(int[] p1, int[] p2, int[] p3, int[] p4) {
int d1 = direction(p3, p4, p1);
int d2 = direction(p3, p4, p2);
int d3 = direction(p1, p2, p3);
int d4 = direction(p1, p2, p4);
if ( ((d1>0 && d2<0) || (d1<0 && d2>0)) &&
((d3>0 && d4<0) || (d3<0 && d4>0))) {
return true;
} else if ( d1==0 && onSegment(p3, p4, p1)) {
return true;
} else if ( d2==0 && onSegment(p3, p4, p2)) {
return true;
} else if ( d3==0 && onSegment(p1, p2, p3)) {
return true;
} else if ( d4==0 && onSegment(p1, p2, p4)) {
return true;
} else {
return false;
}
}

public static double area(int[] p1, int[] p2, int[] p3){
// return (p1[0]*p2[1]+p2[0]*p3[0]*p1[1] - p1[0]*p3[1] - p2[0]*p1[1] - p3[0]*p2[1])/2.0;
return Math.abs( Main.direction(p1, p2, p3)/2.0 );
}

public static void meet(int[] p1, int[] p2, int[] p3,int[] p4, int p5[],int n) {
double area = Main.area(p1, p2, p3);
System.out.println("Case "+n);
System.out.print(area);
boolean b1 = segmentInsert(p1, p2, p5, p4);
boolean b2 = segmentInsert(p1, p3, p5, p4);
boolean b3 = segmentInsert(p3, p2, p5, p4);

if (b1 && b2 && b3) {
System.out.println(" Yes");
}else{
System.out.println(" No");
}

}

public static void main(String[] args){
Scanner in = new Scanner(System.in);
while(in.hasNext()){
int n = in.nextInt();
for (int i = 1; i <= n; i++) {
//三角形三点
int[] p1 = {in.nextInt(), in.nextInt()};
int[] p2 = {in.nextInt(), in.nextInt()};
int[] p3 = {in.nextInt(), in.nextInt()};
int[] p4 = {in.nextInt(), in.nextInt()};
int[] p5 = {in.nextInt(), in.nextInt()};
Main.meet(p1, p2, p3, p4, p5, i);
}
}
}
}

1
2
3
4
5
6
7
8
9
10
11
12
13
14
15
16
17
18
19
20
21
22
23
24
25
26
27
28
29
30
31
32
33
34
35
36
37
38
39
40
41
42
43
44
45
46
47
48
49
50
51
52
53
54
55
56
57
58
59
60
61
62
63
64
65
66
67
68
69
70
71
72
73
74
75
76
77
78
79
80
81
82
83
84
85
86
87
88
89
90
91
92
93
94
95
96
97
98
99
100
101
102
103
104
105
106
107
108
109
110
111
112
113
114
115
116
117
118
119
120
121
122
123
124
125
126
127
128
129
130
131
132
133
134
135
136
137
138
139
140
141
142
143
144
145
146
147
148
149
150
151
152
153
154
155
156
157
158
159
160
161
162
163
164
165
166
167
168
/**
* @author corlymeng.com
* @date 2015年10月30日
*/
package com.corlymeng.sort;

public class AllSort {
//保存排序的结果
private int[] recType = null;

public AllSort(int[] arr) {
recType = arr;
}

////////////////////////插入排序 start/////////////////////////////
//插入排序
public void insertSort(int n) {
int i,j;
int tmp;
for(i=1; i<n; i++) {
tmp = recType[i];
j = i - 1;
while(j >= 0 && tmp < recType[j]) {
recType[j+1] = recType[j];
j--;
}
recType[j+1] = tmp;
}
}
//二分插入排序
public void insertSort1(int n) {
int i,j,low,high,mid;
int tmp;
for(i=1; i<n; i++){
tmp = recType[i];
low = 0;
high = i - 1;
while(low <= high){
mid = (low + high)/2;
if(tmp < recType[mid])
high = mid - 1;
else
low = mid + 1;
}
for(j=i-1; j>high+1; j--){
recType[j+1] = recType[j];
}
recType[high+1] = tmp;
}
}
//希尔排序
public void shellSort(int n){
int i,j,gap;
int tmp;
gap = n/2;
while(gap>0){
for(i = gap; i<n; i++){
tmp = recType[i];
j = i - gap;
while(j >= 0 && tmp < recType[j]){
recType[j+gap] = recType[j];
j = j-gap;
}
recType[j+gap] = tmp;
}
gap = gap/2;
}
}
////////////////////////插入排序 end/////////////////////////////

////////////////////////交换排序 start/////////////////////////////
//快速排序
public void quickSort(int s,int t){
int i = s,j = t;
int tmp;
if (s < t) {
tmp = recType[s];
while (i != j) {
while(j > i && tmp <= recType[j])
j--;
recType[i] = recType[j];
while(i < j && tmp > recType[i])
i++;
recType[j] = recType[i];
}
recType[i] = tmp;
quickSort(s, i-1);
quickSort(i+1, t);
}
}
//冒泡排序
public void bubbleSort() {
int i,j,tmp;
for(i=0; i<recType.length; i++){
for(j=i+1; j<recType.length; j++){
if (recType[i] > recType[j] ) {
tmp = recType[i];
recType[i] = recType[j];
recType[j] = tmp;
}
}
}
}

////////////////////////交换排序 end/////////////////////////////

////////////////////////选择排序 start///////////////////////////
//简单选择排序
public void selectionSort() {
int i,j,tmp;
for(i=1; i<recType.length; i++){
tmp = recType[i];
j=i-1;
while(j>=0 && tmp<recType[j]){
recType[j+1] = recType[j];
j--;
}
recType[j+1] = tmp;
}
}

//堆排序,排序是从数组的下标是1的元素开始排序的。
public void heapSort() {
for(int i=recType.length-1; i>0; i--){
buildHeap(i);
//每次排序完将将最大的元素调到最后
recType[0] = recType[i];
recType[i] = recType[1];
recType[1] = recType[0];
}
}
//调整二叉堆
private void percolateDown (int hole, int currentSize) {
int child;
int tmp = recType[hole];
for (; hole*2 <= currentSize; hole = child) {
child = hole*2;
if (child != currentSize && recType[child+1]>recType[child])
child++;
if (recType[child]>tmp)
recType[hole] = recType[child];
else
break;
}
recType[hole] = tmp;
}
private void buildHeap (int currentSize) {
for (int i=currentSize/2; i>0; i--)
percolateDown(i, currentSize);
}
////////////////////////选择排序 end/////////////////////////////

public void printArr(){
for(int i=0; i<recType.length; i++ ){
System.out.print(recType[i]+" ");
}
}

public static void main(String[] args) {
int[] arr = {0,5,2,3,8,9,7,5,4,11,25,22};
AllSort allSort = new AllSort(arr);
// allSort.quickSort(0, arr.length-1);
// allSort.selectionSort();
allSort.heapSort();
allSort.printArr();
}
}